When I Grow Up // 5 Steps to Transforming Your Nursery Into A Child’s Room

Although we sometimes wish they would, our little babies don’t stay babies forever, and in turn their nurseries shouldn’t stay nurseries forever. You might think that completely changing your child’s room means a huge price tag but I’m here to tell you that is not the case. There are some simple steps to transform a nursery to a children’s room.

Simple Steps:

1. Do a simple paint swap. Warm and rustic hues help allow the room to be used for your kid’s childhood AND teenage years.

Screenshot 2014-07-11 16.28.37     Screenshot 2014-07-11 16.29.19Screenshot 2014-07-11 16.28.55Screenshot 2014-07-11 16.29.05

Screenshot 2014-07-11 16.29.37     Screenshot 2014-07-11 16.30.30Screenshot 2014-07-11 16.30.13Screenshot 2014-07-11 16.30.23

2. Incorporate that light pink and blue into the new room.

Screenshot 2014-07-11 16.21.25

3. Purchase a bed large enough to use even after they have their growth spurt.

Here are some of our favorites from Hickory White furniture:

catalog_image_display.php

Elsa Upholstered King Bed (Hickory White)

catalog_image_display.php-3

King Upholstered Panel Bed

We’re loving Century Furniture too!

88_002K_PS10_medium

California King Bed Base Upholstered

4. Use sophisticated furniture with age-appropriate accessories.

Hickory Chair is giving us some pretty great options for furniture!

190_70_WM

Artisan Curved Front Chest with Drawer Overlay – Ash

9589_70_WM

Sabine Dresser

122_24

9th Street Chair

9507_24_FV

Giles Chair

5. Emphasize a hobby or activity that your child is sure to keep interest in for many years to come.

Screenshot 2014-07-11 16.21.51


Not only will your child love their new “big girl” or “big boy” room, but these easy steps will ensure that you won’t have to break the bank on a new room for your child in the next five to ten years.


Rock-A-Bye Baby // Little Things for Your Little One

When you think of rooms that need interior design help, you usually think of a living room or bedroom, maybe a kitchen or a bathroom, right? What about a nursery? Funny how we neglect the ascetics and comfort of one of the most important rooms in the  house. The little details are what make your nursery perfect for your little one.

IMG_5405

IMG_5622

Comfy and cute!

IMG_5625

DSC_0058

How precious!

DSC_0064

DSC_0065

DSC_0066

The perfect blankie for you baby!

DSC_0067

Forget about Toys-R-Us and check out the the the toys that you AND your baby will love. Not only are they safe for all ages but every one of these items can be monogrammed and customized.  Even better, your nursery will look stunning!

Let’s Be Frank // Impressive Hotdog Recipes for the Fourth

If there are hamburgers there have to be hotdogs as well right? Why not prepare the best hamburgers AND hotdogs in the neighborhood? These recipes will have your guests begging you to throw another cookout this summer!
Steak House Dog

Screenshot 2014-07-02 19.01.34

Serves 4 // Hands-On Time: 10m // Total Time: 10m
Ingredients:
  • 4 hot dogs
  • 4 hot dog buns, split
  • 2 plum tomatoes, sliced
  • 1/4 white onion, thinly sliced
  • 1/4 cup steak sauce

Directions:

  1. Cook the hot dogs according to the package directions.
  2. Place a hot dog in each bun and, dividing evenly, top with the tomatoes, onion, and steak sauce.


Tahini Dog

Screenshot 2014-07-02 19.02.20

Serves 4 // Hands-On Time: 15m // Total Time: 15m
Ingredients:
  • 4 hot dogs
  • 1/4 small head red cabbage, finely shredded (about 2 cups)
  • 3 tablespoons red wine vinegar
  • kosher salt and black pepper
  • 2 tablespoons plain yogurt
  • 2 tablespoons tahini (sesame paste)
  • 4 hot dog buns, split
  • 2 scallions
  • 1/4 teaspoon crushed red pepper

Directions:

  1. Cook the hot dogs according to the package directions.
  2. In a medium bowl, mix together the cabbage, vinegar, ½ teaspoon salt, and ¼ teaspoon black pepper. In a small bowl, mix together the yogurt, tahini, and 2 tablespoons water.
  3. Place a hot dog in each bun and, dividing evenly, top with the cabbage and yogurt mixtures, scallions, and crushed red pepper.


Guacamole Dog 

Screenshot 2014-07-02 19.03.19

Serves 4 // Hands-On Time: 10m // Total Time: 15m
Ingredients:
  • 4 hot dogs
  • 1 avocado, peeled and pitted
  • 1 tablespoon fresh lime juice
  • kosher salt and black pepper
  • 4 hot dog buns, split
  • 4 small romaine lettuce leaves
  • 1/4 small red onion, chopped
  • hot sauce (such as Tabasco), for drizzling

Directions:

  1. Cook the hot dogs according to the package directions.
  2. In a medium bowl, mash the avocado with the lime juice; season with ¼ teaspoon each salt and pepper.
  3. Place a hot dog in each bun and, dividing evenly, top with the lettuce, mashed avocado, and onion. Drizzle with the hot sauce.

Bacon Barbecue Dog

Screenshot 2014-07-03 01.50.41

Serves 4 // Hands-On Time: 10m // Total Time: 15m

Ingredients:
  • 4 slices bacon
  • 4 hot dogs
  • 4 hot dog buns, split
  • 1/4 cup barbecue sauce
  • 4 ounces Cheddar, grated (1 cup)

Directions:

  1. In a large skillet over medium heat, cook the bacon until crisp, 6 to 8 minutes; let cool, then crumble.
  2. Meanwhile, cook the hot dogs according to the package directions.
  3. Place a hot dog in each bun and, dividing evenly, top with the barbecue sauce, Cheddar, and bacon.


Mac and Cheese Dog

Screenshot 2014-07-03 01.53.27

Serves 4 // Hands-On Time: 15m // Total Time: 15m
Ingredients:
  • 4 hot dogs
  • 1/2 cup panko bread crumbs
  • 1 tablespoon chopped fresh parsley
  • 1 tablespoon vegetable oil
  • kosher salt and black pepper
  • 4 hot dog buns, split
  • 1 cup prepared macaroni and cheese (boxed, frozen, or homemade)

Directions:

  1. Cook the hot dogs according to the package directions.
  2. Meanwhile, heat oven to 350° F. On a rimmed baking sheet, toss together the bread crumbs, parsley, oil, and ¼ teaspoon each salt and pepper. Bake until golden, 4 to 6 minutes.
  3. Place a hot dog in each bun and, dividing evenly, top with the mac and cheese and the bread crumbs.


Reuben Dog

Screenshot 2014-07-03 01.54.33Serves 4 // Hands-On Time: 15m // Total Time: 15m

Ingredients:

  • 4 hot dogs
  • 4 hot dog buns
  • 1/2 cup sauerkraut
  • 1/2 cup grated Swiss cheese
  • 1/2 cup Thousand Island dressing

Directions:

  1. Cook the hot dogs according to the package directions.
  2. Split and toast or grill the buns.
  3. Place the hot dogs in the buns and, dividing equally, top with the sauerkraut, cheese, and dressing.
Tropical Dog

Screenshot 2014-07-03 01.55.59

Serves 4 // Hands-On Time: 15m // Total Time: 15m

Ingredients

  • 4 hot dogs
  • 4 hot dog buns
  • 1/2 cup chopped fresh pineapple
  • 1/4 cup sweet red cherry peppers (such as Peppadews)
  • 1/2 cup fresh cilantro leaves

Directions

  1. Cook the hot dogs according to the package directions.
  2. Split and toast or grill the buns.
  3. Place the hot dogs in the buns and, dividing equally, top with the pineapple, peppers, and cilantro.

Recipes from http://www.realsimple.com/food-recipes

Keep Calm and Grill On // Burger Recipes for the Fourth

Can’t you just smell the hamburgers and hear the sizzle of the grill? Is your mouth watering just thinking about the great food that will be at the cookout tomorrow? Oh, YOU are having the cookout?! Well in that case I think you could use a few crowd pleasing burger recipes to ensure your guests leave with full bellies and big smiles.

Cheesy Philly Cheesesteak Burgers

tsri-cheesy-philly-cheese-steak-gourmet-burger

Serves 4

Burger Ingredients:

  • 2 pounds ground sirloin or chuck
  • 1 tablespoon Montreal grill seasoning
  • 1 tablespoon A-1 Steak Sauce
  • 1 teaspoon kosher salt
  • 1 teaspoon fresh ground black pepper

Toppings:

  • 1 large yellow onion
  • 2 bell peppers (I used ½ each: red, orange, yellow and green)
  • 2 tablespoons unsalted butter, divided
  • Kosher salt
  • Fresh ground black pepper
  • 4 hamburger buns
  • 1 recipe Smoked Provolone Cheese Sauce (<< click for recipe)

Directions:

  1. Combine burger ingredients in a large mixing bowl.  Mix with hands to combine.  Do not over mix.
  2. Form beef into 4 patties, slightly larger than your bun.  Make a slight indentation in the center of the burger to prevent it from doming up in the center. (The indentation will rise as your burger cooks).  Set aside while you prepare the toppings.
  3. Melt 1 tablespoon butter in a large skillet over medium high heat, add onions.  Toss to coat, cover and cook for 20-25 minutes until onions are caramelized, stirring occasionally. Season with salt and pepper, to taste.
  4. Meanwhile in a large skillet over high heat, melt 1 tablespoon butter.  Add sliced peppers, toss to coat.  Cook until peppers are soft.  Season with salt and pepper, to taste.
  5. Preheat grill to high.
  6. Grill until golden brown and slightly charred (about 3 minutes), turning once (cook for 3 minutes on the other side for medium). Close grill cover.  Try not to press down on your burger with a spatula. It will cause the juices to escape and will create a dry burger!
  7. Toast buns on low or indirect heat.
  8. To dress burger:  Place burger on toasted bottom bun, top with ¼ of the sautéed peppers, ¼ of the caramelized onions and a heaping spoon of smoked provolone cheese sauce, top with toasted top bun.  Serve and enjoy!


Cheesy Bacon Cowboy Burger

tsri-cheesy-bacon-cowboy-burger

Serves 4

Burger Ingredients:

  • 2 pounds ground sirloin
  • 1 tablespoon Worcestershire sauce
  • 1 teaspoon smoked paprika
  • 1 teaspoon ground chile de arbol (or cayenne pepper to taste)
  • 1 tablespoon A-1 sauce
  • 1 teaspoon fresh ground black pepper
  • 1 teaspoon ground cumin

Toppings:

  • 8 onion rings
  • 1 cup favorite barbecue sauce
  • 4 strips thick cut bacon, cooked
  • 4 slices mild cheddar cheese
  • lettuce
  • tomato, sliced
  • 4 big hamburger buns

Directions:

  1. Preheat grill to high.
  2. Combine first 7 ingredients in a bowl.  Mix with hands to combine.  Do not over mix.
  3. Form beef into 4 patties, slightly larger than your bun.  Make a slight indentation in the center of the burger to prevent it from doming up in the center. The indentation will rise as your burger cooks.
  4. Grill until golden brown and slightly charred (about 3 minutes), turning once (cook for 3 minutes on the other side for medium). Try not to press down on your burger with a spatula. It will cause the juices to escape and will create a dry burger!
  5. Toast buns on low or indirect heat.
  6. Place lettuce and tomato slices on bun, top with burger, cheese,m bacon and 1/4 cup barbecue sauce.  Add 2 onion rings. Serve and enjoy!


Steakhouse Smoky Barbecue Beer Burgers with Caramelized Beer Onions

tsri-Steakhouse-Smoky-Barbecue-Beer-Burger

Serves 6

Ingredients:

  • 1 large yellow onion
  • 1 tablespoon unsalted butter
  • 1 teaspoon brown sugar
  • 2 ½ pounds 80%/20% ground beef
  • 3 cloves garlic, minced
  • 2 teaspoons smoked paprika
  • 1 teaspoon ground cumin
  • 1 tablespoon Worcestershire sauce
  • 2 teaspoons spicy Montreal steak seasoning
  • 1 (12 ounce) bottle dark beer, divided
  • ½ teaspoon fresh ground black pepper
  • 2 tablespoons extra virgin olive oil
  • kosher salt
  • 6 ounces KC Masterpiece Smoky Bourbon Barbecue Sauce (or your favorite)
  • 6 hamburger buns
  • 6 slices of cheddar cheese
  • 6 tablespoons mayo
  • lettuce

Directions:

  1. Warm a 10” skillet over medium high heat.  Meanwhile, slice onion.  Add butter and onion to skillet.  Sprinkle with sugar.  Stir to combine.  Stir occasionally until onions start to brown, about 6 minutes.
  2. Preheat grill to high.
  3. While onions are cooking, combine beef, garlic, paprika, cumin, steak seasoning, Worcestershire sauce and 4 ounces of beer in a large mixing bowl.  Mix to combine. Portion beef mixture and form into patties slightly larger than your bun.  Make a slight indentation in the center of the burger on one side to prevent it from doming up in the center. The indentation will rise as your burger cooks.  Set aside.
  4. Pour remaining beer into skillet with onions.  Stir to combine, cover and cook for 15 minutes, or until beer evaporates.
  5. Brush burgers with olive oil and lightly sprinkle them with salt.
  6. Place burgers on grill with the indentation side facing up.  Close lid and cook for 3 minutes.  Flip, brush with barbecue sauce and grill for 3 minutes on the other side.  Toast buns on grill.
  7. Assemble burger.  Spread 1 tablespoon mayo on each bottom bun.  Add lettuce, burger, cheese, caramelized onion and remaining barbecue sauce.


Big Kahuna Hawaiian Burger

big-kahuna-burger
Serves 2

Ingredients:

  • ½ teaspoon ground ginger
  • ½ teaspoon garlic powder
  • 1 teaspoon low sodium soy sauce
  • ½ teaspoon salt
  • 1 pound lean ground beef
  • 2 tablespoons pineapple juice
  • 2 tablespoons teriyaki sauce
  • 4 slices brown sugar ham
  • 4 slices red onion
  • 2 slices Swiss cheese
  • lettuce
  • mayonnaise
  • 2 big sesame seed hamburger buns

Directions:

  1. Preheat grill to medium-high.
  2. Mix pineapple juice and teriyaki sauce together.  Set aside.
  3. Mix beef, ginger, garlic, salt  and soy sauce in a small bowl.  Divide into 2 patties and form into patties slightly larger than your bun.  Make a slight indentation in the center of the burger to prevent it from doming up in the center. The indentation will rise as your burger cooks.
  4. Grill until golden brown and slightly charred (about 3-5 minutes), turning once (cook for 3 minutes on the other side for medium). Baste with pineapple teriyaki sauce as your burger cooks. Try not to press down on your burger with a spatula. It will cause the juices to escape and will create a dry burger!
  5. Grill pineapple slices until pineapple have golden brown grill marks on both sides.
  6. Toast hamburger buns by placing on grill until grill marks form.  Do not walk away during this process.  Toast can turn to ash in the blink of an eye.
  7. Spread mayo on bottom bun.  Top with lettuce, burger, Swiss cheese, grilled pineapple, red onion and ham.
  8. Serve and enjoy!


Ole Smoky – Hickory Peppercorn Bacon Cheese Burger

ole-smoky-hickory-bacon-bur
Serves 4

Ingredients:

  • 2 pounds lean ground beef
  • 2 tablespoons Worcestershire sauce
  • 2 1/2  tablespoons hickory liquid smoke flavoring
  • 1 tablespoon 4 peppercorn blend, crushed
  • 1 teaspoon salt
  • 1 tablespoon olive oil
  • 4 slices mild cheddar cheese
  • 4 slices bacon, cooked
  • 8 slices red onion
  • 4 hamburger buns

Directions:

  1. Preheat grill to medium high.
  2. In a large mixing bowl combine beef, Worcestershire sauce, liquid smoke, salt and peppercorn.  Mix to combine and form into 4 patties slightly larger than your bun.  Make a slight indentation in the center of the burger to prevent it from doming up in the center. The indentation will rise as your burger cooks.  Lightly brush burger with olive oil to prevent sticking.
  3. Grill until golden brown and slightly charred (about 3 minutes), turning once (cook for 3 minutes on the other side for medium). Try not to press down on your burger with a spatula. It will cause the juices to escape and will create a dry burger!
  4. Toast hamburger bus by placing on grill until grill marks form.  Do not walk away during this process.  Toast can turn to ash in the blink of an eye.
  5. Serve burger on toasted bun with a slice of mild cheddar cheese, 1 slice of bacon cut in half, and red onion.


Knock Your Boots Off Tex-Mex Burgers

tex-mex-burger

Serves 4

Ingredients:

  • 2 pounds ground 93% lean beef, portioned in 8 ounce servings
  • 2 teaspoons Tex-Mex seasoning (or your favorite, Mrs Dash SW Chipotle Seasoning is fantastic, remember to add salt)
  • 1 cup shredded cheddar cheese
  • 1 cup Guacamole (your favorite store bought, I love Wholly Guacamole Pico de Gallo Guacamole here)
  • 1 cup Pico de Gallo(or your favorite fresh salsa)
  • 4 large hamburger buns
  • butter, room temperature

Directions:

  1. Preheat your grill to high.  These burgers are fantastic on any grill from stove top to charcoal and everywhere in between.
  2. Form beef into 1/2″ patties, making a slight indentation in the center of the burger to prevent it from doming up in the center.  The indentation will rise as your burger cooks.  Sprinkle each patty with 1/2 teaspoon Tex-Mex seasoning.  Gently rub seasoning into meat.
  3. Grill until golden brown and slightly charred (about 5 minutes), turning once (cook for 4 minutes on the other side for medium). Avoid pressing with a spatula, you don’t want the juices to escape! Add cheese for the last minute of cooking.
  4. Butter buns and place on grill (inside down) for about 1 minute, until they are golden brown with grill marks.  Remove buns and prepare with 1/4 cup guacamole on the bottom bun.  Place burger on top and 1/4 cup pico de gallo on top.


50/50 Beef Bacon Burger

50-50-beef-bacon-burger

Serves 4

Ingredients:

  • 1 pound thick cut bacon
  • 1 pound 93% lean beef
  • 8 hamburger buns
  • butter, melted
  • 4 cheese slices
  • toppings (lettuce, tomato and onion)

Directions:

  1. Preheat oven to 375°.
  2. On a baking sheet with a 1/2″ to 3/4″ lip line up bacon.  Do not let the slices overlap.  Bake for 10-15 minutes until the bacon is partially cooked.  Remove and place on a cooling rack with a cookie sheet under it to catch the grease (or onto paper towels).
  3. Once bacon is drained and cool enough to to handle, place on cutting board and dice bacon or cut with kitchen shears.
  4. Mix bacon and beef well.  Form into 4 patties, not too thick or they will not cook evenly.
  5. Place patties on grill, make sure they are not touching.  Grill for 3 to 5 minutes on each side until done to your preference.
  6. Top with cheese for the last few minutes, and grill your buns by brushing with butter and putting on the grill until toasted with grill marks.  Serve with your favorite toppings, we chose lettuce, tomato and onion.

Recipes from http://parade.condenast.com

Every Heart Beats True for the Red, White, and Blue // Ideas for the Perfect Fourth of July Celebration

What do you love most about the Fourth of July? The abundance of fireworks? Or American flags everywhere you turn? I don’t know about you but our favorite part is the festivities with friends and family. With only two days left to prepare, we have some quick and easy ideas to impress your friends (and taste buds).

 d8e3de536c85660996b8f5087ac14bf5

This simple breakfast fix is so easy! Just spread some cream cheese on the whole slice of toast and then coat 3/4 of the cream cheese with strawberry jelly. Place blueberries on the 1/4 that does not have the jelly on it to make the stars and then line up the banana slices in rows on the jelly section to create the stripes.  Your patriotic breakfast is then complete!

Recipe from http://www.bedifferentactnormal.com

e016f8b15d05d5eec58e7313e2c4eb55

Before the fireworks come out, wow your guests with this sweet and savory appetizer. Cut and cube half of a seedless watermelon. Then cube 8 ounces of feta and rinse off one pint of fresh blueberries. Pour the blueberries into a bowl (preferably square) and place it on the top left section of the platter. Pour the watermelon and feta into alternating rows. Serve with a side of toothpicks.

Recipe from http://wenderly.com

ea7d5468ef26c6df02f4051fd5ea24aa

Another tasty treat will leave your tummy full and your wallet just as full. This recipe only calls for four ingredients: pound cake, strawberries (sliced), blueberries, and whipped cream. Take your pound cake and cut it up into small cubes. Begin to layer the mason jars starting with blueberries, then add the cake pieces, topped with whipped cream and then add the strawberries. Repeat this layer of ingredients until the jar is full! Seal the lid of the mason jar and store in the refrigerator until you are ready to serve this yummy treat!

Recipe from http://www.yummyhealthyeasy.com

2f859941aa36de31c99ab55c95b38779

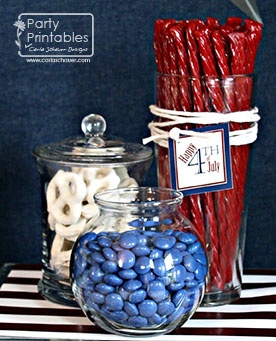
You can really use any clear jars or vases in your house for this one. If you choose to decorate the holders, simply wrap some light colored twine around five to six times and attach a cute red, white, and blue tag (there are some super cute ones at Target). Fill one jar with blue m&ms, another with yogurt or white chocolate covered pretzels, and the last jar with red Twizzlers. Not only is this decoration beautiful, it is also tasty!

Inspired by http://carlaschauer.com

Screenshot 2014-07-02 14.10.54

Here is one of the easiest drinks to whip up before the guests start flooding in. Combine strawberries, blueberries, pineapple cut into star shapes, 2 bottles of white wine, 1 cup triple sec, 1/2 cup berry-flavored vodka, 1/2 cup fresh lemon juice, and 1/2 cup simple syrup in a large pitcher. Stir, chill, serve, and enjoy!

Recipe from http://diyready.com

ceeefb3bd16af2b0097880a1d347010b

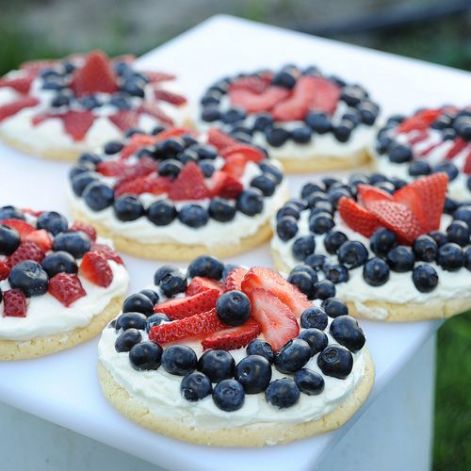
First you’ll need a couple of sugar cookies. You can find them in most grocery stores and if you’re feeling a little more ambitious you can make your own. The recipe for this homemade frosting to spread on the tart is super quick AND it makes enough frosting for about 24 cookies. You’ll need 2 cups powdered sugar, 1/4 teaspoon salt, 1 teaspoon extract (almond or vanilla), 8 ounces of softened cream cheese, and 1 3/4 cups whipping cream. In a large mixing bowl, whisk together the powdered sugar, salt, extract, and cream cheese. Once you see stiff peaks begin to form you can stop whisking. Spread this onto your sugar cookies and decorate them with strawberries, blueberries, raspberries, or black berries. I love that this dessert is like a personal tart, and it’s the perfect size for the kids!

Recipe from http://www.apronstringsblog.com


9055cb2ce472460602691602ccfe6a0d


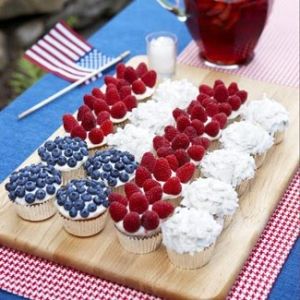
For this delicious remake of the American flag, take your favorite cupcake recipe and just switch up the toppings. Spread a white colored frosting (maybe the extra from the sugar cookie tarts) over each of the cupcakes. Create color by decorating 1/5 of your cupcakes with blueberries, 2/5 of them with strawberries or raspberries, and the other 2/5 with coconut. Bon appétit!

Inspired by http://indulgy.com

84bd08cba806fe7171f85aca5a179bcf

Introducing the most impressive fourth of July cake there ever was. Preparation does take a bit of time, but if you prepare early this will be no big deal. Pull out Grandma’s best vanilla cake recipe. Triple the recipe, but split it up between three different bowls. Leave one of the bowls as is, add blue food coloring to the second, and red food coloring to the third. Bake each bowl in a separate pan. Throw those into the oven and turn on your favorite “Keeping Up With the Kardashians” episode. Once all three are done cooking, place them on a cooling rack and wait until they are cool to the touch. Slice the red and white cakes in half height wise. Then take the blue cake and cut out a small circle in the middle. Then do the same to one of the white cake layers and one of the red cake layers. Now it’s time to start stackin’. Place the full red layer down first followed by the full white layer. Then place the outer ring of the blue layer on top of that. Take the middle parts of the cut up white and red layers. Place the inner part of the red cake down first then the inner part of the white layer. Frost the whole cake and get ready to watch your guests’ jaws drop.

 Inspired by http://justimagine-ddoc.com/crafts

Hope your July 4th part is a success. Enjoy laughs and good stories with friends and family as you enjoy your treats As Ronald Reagan once said, “All great change in America begins at the dinner table”.

What’s the S(t)itch // Monograms on the Rise

I am so excited to see monograms emerge from the archives of ‘previous fashion statements’ and sweep the closets of high school girls and sorority stars. The best thing about this trend coming back is that it is most definitely new and improved. Advances in the monogram world have allowed an abundance of available fonts and colors. AND you can put a monogram on virtually any surface, pillows, chairs, wine glasses, and travel bags to name a few (the monogrammed nail stickers might be a little excessive though). What I wish people would realize though is that monograms aren’t just for teenagers and twenty-somethings! Simply monograms are a way to personalize your belongings. Or personalize a gift. It is a great way to make an okay gift become a breathtaking gift!

IMG_5407

DSC_0040

These would be PERFECT for a bridal party and the bride.

 DSC_0143

DSC_0043IMG_5586

IMG_5587

IMG_5588

Honestly one of the comfiest blankets that ever existed.

DSC_0044DSC_0042

DSC_0142

DSC_0005

IMG_5533

IMG_5531

DSC_0045

DSC_0106IMG_5551

DSC_0108

These plate sets will make your guests’ jaws drop.

DSC_0047

DSC_0058

DSC_0067

Don’t forget about the young ones!

DSC_0051

So classy and unique!

DSC_0101

monogrammed chair

We all know what a wonderful gift a beautiful monogram is for any occassion and Cynthia Porche Interiors definitely has that all covered but since Cynthia’s passion is design and planning events…she also offers custom monograms!

Basically, custom monograms have become the stars of beautiful weddings as they offer the new bride and groom their own “family logo” that becomes such a wonderful gift. Cynthia Porche is one of a few designers even able to offer such a custom logo that stretches far beyond the basic font layouts! These “logo” monograms personalize a family home from the basic towels, napkins, and pillows to incredible detailing on dinnerware, furniture pieces, and bedding. Imagine having a few custom pieces monogrammed within your home or wardrobe or think about giving a custom monogram as a gift for holidays, weddings, birthdays etc. It’s always all in the details at Cynthia Porche Interiors, where almost anything can be created for your home or lifetsyle!!

IMG_5810

IMG_8397

Monograms can be funky or traditional, feminine or masculine. This is such an easy way to make a custom item without spending more than you have to spend. Whatever the occasion, wedding or birthday or just a regular day, monograms are sure to add something a little extra to your style.

She Sells Sea Shells by the Sea Shore // Bringing Summer Into Your Home

Did you have an amazing trip to Hilton Head? Or Destin? Maybe Turks and Caicos?  Let me tell you that you can enjoy that trip all summer (or year) long. The best way to bring in that saltwater breeze and cool relaxation is by actually bringing the beach home with you. We all know your kids already beg to bring home seashells and sand so why not display it in your house? On top of that, replacing dark heavy accessories with light neutral ones will really help you imagine you’re still staying in that oceanfront suite. My favorite beach colors this year are light coral, deep turquoise, and sandy beige, with hints of blues and greens.


IMG_5458  DSC_0152

Love this use of rope to give a nautical vibe.

DSC_0167

A much needed daily reminder…

DSC_0157

DSC_0163

The design looks just like waves washing up on the shore.

IMG_5576

The linen and burlap fabrics really help relocate my mind and sanity back to the beach.

DSC_0150 DSC_0146

Look how perfect these two holders are for those special beach treasures.

DSC_0100

IMG_5574

IMG_5563

I absolutely love this set and its vibrant funky design.

These are such simple fixes to keep that vacation lasting longer than you could afford to hire a dog sitter for. And the best part is, when the weather starts to get a little cooler, just switch your house back to the way it was before!

Pillow Fight! // Pillows and Comforters

Hypothetically speaking, your son, and his comforter, is being sent off to college in the fall leaving you with the skeleton of a bedroom. He took all of his personality pieces with him opening your imagination for this once dark, masculine bedroom. Why not change it into the guest room you always wanted? He only will come home on average twice a year so why not! You may cry a little to yourself just thinking about the price tag on a new bed, armchair, and bench that fit your vision, but I’m here to tell you, no crying allowed!

The simplest and most cost effective redesign is adding a new comforter and pillows. By finding similar color tones and fabric types in both the pillows and comforter, it is simple to add some zest to each furniture piece in the room. The key is finding pillows that could go on the bed OR on the armchair and bench. If the positioning of each accent is interchangeable the room is sure to look unified and complete. 

Each in-store pillow is paired with a redly available Eastern Accents comforter. 

Picture

 
Picture

 
Eastern Accents // SILAS DUVET COVER AND COMFORTER

Picture

 
Picture

 
Eastern Accents // ANTHEMION IVORY/BLACK DUVET COVER

Picture

 
Picture

 
Eastern Accents // CAPRI DUVET COVER AND COMFORTER

Picture

 
Picture

 
Eastern Accents // AILEEN DUVET COVER AND COMFORTER

Picture

 
Picture

 
Eastern Accents // INDIRA INK DUVET COVER AND COMFORTER

Picture

 
Picture

 
Eastern Accents // GLENWOOD DUVET COVER AND COMFORTER

These beautiful pairs will enhance the furniture pieces you already have without breaking the bank. The comforters will bring…well, comfort to the new space and the pillows will exemplify the beautiful colors and designs of each of the duvets. And don’t forget, you can’t have a great pillow fight without great pillows!

Congrats Grad // CPI College Essentials

Going off to college is a crazy transition, but we know a way to make that experience a little easier and a lot more stylish. Each of these items can be monogrammed in any font with any color.

Picture

 
Our monogrammed burlap totes are perfect for everyday college use. They are great for holding books for class or maybe a change of clothes for the gym. 
Picture

 
Even though those dorm rooms are small, it sure is easy to lose that new mascara. These makeup bags are great for holding everything from eyeshadow to lipgloss. There are fun colors to choose from with endless mix-and-match possibilities. 
Picture

 
For a more masculine option, we have this great toiletries carrier. With so many compartments this is a wonderful way to save counter space by stashing all of your toiletries in here.
Picture

 
Laundry is already a drag, so why not spice it up with this colorful canvas laundry bag (not an intentional rhyme, but if you say it with a rhythm I’m not going to stop you). Coming in four colors, sea foam green, navy blue, raspberry, and yellow, one of these bags can be a gift for a girl or a guy. With an added monogram you can be sure not to mix up your laundry with anybody else’s. 
I definitely have to admit that these key items would have saved me from sporting my hideous backpack and my shabby mesh laundry basket (that may or may not have broken to my embarrassment and frustration the second week of college).

Your Newest Superheroes // The Dream Team

What if I told you that it was unnecessary to separately hire a plumber, electrician, contractor, AND designer for a remodel? Sound too good to be true? Think again! The Dream Team is here to ease your anxiety of anything from a simple kitchen redesign to a full home renovation. 
 
Cynthia and Kevin Porche create a dynamic duo specializing in home renovation and design. These two can make your wildest dreams into a reality. It seems that Kevin Porche seems to relate most with Mr. Incredible. He provides the muscle for the job, laying hardwood floors, putting in tile, reconstructing cabinets, and installing granite countertops. On the other hand, Cynthia portrays more of a Mrs. Incredible character. She can bend the preconceived guidelines suppressing your dream room. Whether that be a beachy bedroom or luxurious living room, Cynthia can do it. Her access to hundreds of fabrics allows her creativity to speak through her designs. No longer will you be waiting around for your home renovation heroes, they’re here! Although they usually leave the capes at home, there is no looking past their ability to save the day (or save your living room from those hideous window treatments).Picture